


Ah, summer. The carefree time of year for backyard barbecues, late nights, and lazy poolside afternoons. Seen through a not so romanticized lens, summer can also be a time of unwanted weight gain, poor nutrition, and exercise neglect…
I think all of us mere mortals can relate to what I call “Tomorrowitis,” that ubiquitous and debilitating condition by which we put off working out, making a fresh home-cooked meal, waking up early for a run, or swimming laps in the pool instead of lounging by it. Tomorrow, we tell ourselves, we’ll replace our sandals with sneakers, our swimsuits with sports bras, and our daiquiris with dumbbells. We’ll resume our fitness routines first thing in the morning.
But tomorrow comes and goes and we’re still soaking up the sun and letting unhealthy habits have their way.

Summer is a blissful season, the time when we all, no matter our age, reconnect with our inner child and embrace the free-spiritedness that seems to permeate the air (also known as humidity here in Texas!). I’m not writing this to say you should become a summertime Scrooge and swear off summer fun – you absolutely shouldn’t! But I do want to encourage balance and to show you that fitting fitness into your summer schedule is a piece of gluten-free, sugar-free, carb-free cake (just kidding! If you’re gonna eat cake, eat real cake!)
When our bodies and minds are strong, and our moods are good and our confidence high, we are much better equipped to serve and love our families and friend and – guess what – to enjoy the pleasures of life! It is when we allow our fitness to fall by the wayside that health problems eventually creep in and hinder us from living to the full. Exercising for 30 minutes to an hour three to five times a week is, I believe, one of the most loving things we can do for ourselves and also for others.
What follows are three equipment-free workouts you can do anywhere your adventures may take you this summer. Each routine will consist of a five-minute warmup portion and a 10-minute workout.
If you have time, I would highly recommend that you take time stretch at the end of every workout, focusing on the muscles most emphasized that day, as well as any areas that feel particularly tight or sore.
Stretching improves circulation, increases flexibility, helps maximize the range of motion in your joints, and reduces soreness and stress! Each stretch should be held between 15 and 30 seconds and should feel good. If it becomes painful, ease up a bit, breathe deep, and go slower.
And whatever you do, don’t skip the warmup!
WHY WARM UP? Because warming up properly is full of benefits, including:
- Elevation of body temperature
- Increase blood flow in the muscles
- Improves efficient cooling
- Improves range of motion
- Reduces incidence and likelihood of musculoskeletal injuries
- Supplies adequate blood flow to heart
- Provides rehearsal of movements performed in the workout
- Mental preparation
As you can see, the warmup prepares us for an effective and rewarding workout. When the workout (the fun part!) begins, our blood is flowing hot, our hearts are pumping strong, and our minds are thinking fast, each part of us giving one-hundred percent to the exercises at hand.
There are just a few more things to fill you in on before we get started. First, I’ll be using the Tabata protocol for the first routines Tabata raining was discovered by Japanese scientist Dr. Izumi Tabata and a team of researchers from the National Institute of Fitness and Sports in Tokyo. Dr. Tabata and his team conducted research on two groups of athletes. The first group trained at a moderate intensity level, and the second group trained at a high-intensity level. The moderate intensity group worked out five days a week for a total of six weeks; each workout lasted one hour. The high-intensity group exercised four days a week for six weeks; each workout lasted four minutes and 20 seconds (with 10 seconds of rest in between each set).
The results: Group 1 had increased their aerobic system (cardiovascular), but showed little or no results for their anaerobic system (muscle). Group 2 showed much more increase in their aerobic system than Group 1, and increased their anaerobic system by 28 percent. In conclusion, high-intensity interval training has more impact on both the aerobic and anaerobic systems.
A Tabata workout lasts only four minutes, but provides one heckuva bang for your buck! The structure of the program is as follows:
- Workout hard for 20 seconds
- Rest for 10 seconds
- Complete eight rounds
If you have a smartphone, there are several apps you can download that will provide a Tabata timer so you don’t have to keep track of when to start and stop yourself.
Second, allow me to explain another word that may be foreign to you: “AMRAP.” AMRAP is an acronym for “as many rounds as possible.” This means you will complete the workout’s featured circuit as many times as you can within the given time period. The intent here is to keep the intensity high so you can incinerate body fat, build lean muscle, and challenge your heart in very little time. Efficiency is the name of the game!
Now go change into your gym attire, grab a towel and some water, and let’s get started!
NOTE: The exercise instructions will be listed in alphabetical order at the end of the blog!
Routine 1
WARMUP:
10 Lunges each leg with arms overhead, fingers interlaced. Hold each lunge for three to five seconds.
10 slow Air Squats. Hold at the bottom for five seconds, driving the knees out with the elbows to open up the hips.
10 Reverse Lunges with arms overhead, fingers interlaced. Hold each lunge for three to five seconds.
10 Air Squats at a normal pace. Be sure to squat to at least parallel. If you can, lower until your hip crease is below your knees.
20 Sit-Ups[1]
30 Arm Circles each direction
10 Elevator Push-Ups (traditional or modified)
WORKOUT:
8 Rounds Tabata[2] Air Squats
Rest 1 minute.
8 Rounds Tabata Push-Ups (traditional or modified)
Then, immediately do one minute of as many Squat Pulses as possible.
Routine 2
WARMUP:
15 slow Air Squats (Hold at the bottom for five seconds, driving the knees out with the elbows to open up the hips.)
15 Squat Pulses
20 Arm Circles each direction
15 Push-Ups (traditional or modified)
30 Jumping Jacks
30-second Forearm Plank Hold
WORKOUT:
3 minutes of as many Burpees as possible.
Rest 1 minute.
2 minutes of as many Burpees as possible.
Rest 1 minute.
1 minute of as many Burpees as possible.
Routine 3
WARMUP:
20 Lunges (10 each leg)
10 Walk-out/Walk-ins
20 Lateral Lunges (10 each leg)
10 Arm Circles each direction
20 Scorpions (10 each side)
20 Reverse Lunges (10 each leg)
10 Burpees
WORKOUT:
10-min. AMRAP:
20 Butt-Kicks
10 Push-Ups (traditional or modified)
5 Jump Squats
Exercise Instructions (listed in alphabetical order)
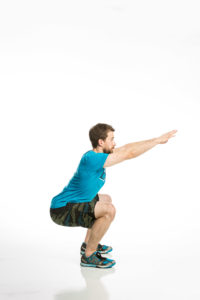
Air Squat
- Stand with your feet spread apart at a distance slightly wider than the shoulders. Position your feet so that your toes angle out. This angle varies from person to person, but should be about 30 degrees. Keep your weight on the heels to prevent yourself from rolling up onto the balls of your feet.
- Keep your chest up, shoulders back, head up. This helps promote a nice, safe, intact lumbar curve.
- Place arms straight out in front of your chest. The arms should be in a comfortable position as they act as counter balance to the motion of the exercise.
- Bend your knees as you lower yourself down. Pretend there is a chair behind you that you’re reaching back to sit on. Your knees should track over your feet and never jut out over them. In other words, your knees should be pointing in the same direction as your toes. If you find your knees starting to cave in, focus on pushing them out. A good way to achieve this is by imagining you are tearing the floor apart with your feet.
- The push back up should be generated from your hamstrings and glutes. Your chest and head should remain pointing straight forward. As you rise, your arms will probably lower back to your sides naturally. Make sure your knees keep tracking with your toes and do not begin to buckle inwards. Also be sure to keep your lumbar curve intact (curved). Generally speaking, if you have your chest and head up, your lumbar curve will be in the correct position.
Arm Circles
- Stand in a neutral position with feet hip-width apart. Your arms should be straight out to the sides so your body forms a “T.”
- Begin making slow circles in a forward motion with your arms, then gradually make larger ones and complete the given number of repetitions.
- Repeat in the opposite direction.
Burpee
- Lower your body down using proper squat form. Place hands on the ground in front of you.
- Jump your feet back to a plank position, then quickly lower your chest to the ground.
- Push yourself back up to a plank position and jump your feet back in toward your hands..
- Jump back up and simultaneously clap your hands behind your head. Stand up all the way, extending the hips fully before beginning your next rep.


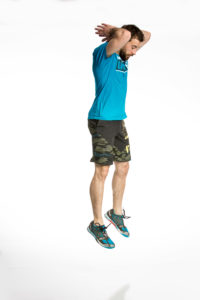
NOTE: To modify this exercise, you may eliminate the push-up component. To further modify for beginners, you may also walk your feet out and back in instead of jumping them out and in.
Elevator Push-Up
- See the instructions for push-ups below.
- Start in the traditional or modified push-up position.
- Lower yourself a quarter of the way down and pause for three seconds.
- Lower another quarter and pause for three seconds.
- Lower another quarter and pause for three seconds.
- Lower once more and explosively push back up to the starting position.
Jumping Jack
- Begin by standing feet together with arms at your sides.
- Bend your knees and jump, moving your feet apart until they are wider than shoulder width. (You should be on the balls of your feet.) At the same time, raise your arms all the way overhead.
- Maintain a slight bend in your knees as you jump your feet back together and return your arms to your sides. Repeat for the given number of reps.
Jump Squat
- Refer to the “Air Squat” description.
- Jump explosively to rise out of the squatting position.
- With control, land in a squat position to complete one rep.
NOTE: Remember not to let your knees jut over your toes or let them cave inward as you jump.
Forearm Plank Hold
- Get into a standard push-up position, and then lower yourself onto your forearms. Elbows should be aligned below your shoulders, and arms parallel to your body at about shoulder-width distance.
- Keep your core tight, bellybutton pulled in toward your spine as you hold this position.
Lateral Lunge
- Stand with your feet hip-width apart and make sure you have about two to three feet of space on either side of you.
- Step sideways a comfortable distance, 2 or 3 feet, with one leg. Plant the heel of the lunging foot and keep the foot of the non-lunging leg pointed forward.
- Sit back into the lunging leg to create a definite crease in your hip. Keep your weight in the heel.
- Push off the heel of the lunging foot to bring feet together to the standing position. Repeat on opposite side and alternate for given number of repetitions.

Lunge (walking and stationary)
- Stand with feet shoulder-width apart, torso upright with arms hanging straight at your sides.
- Take a slow, controlled lunge forward with one foot. As you lunge, lower your body and allow the lunging knee to bend until your thigh is parallel to the ground.
- If performing a stationary lunge, push explosively off the lunging foot to return to the starting position. If performing walking lunges, push through the heel of the lunging foot to bring the back foot to meet it.
Reverse Lunge
- Stand with feet shoulder-width apart, torso upright with arms hanging straight at your sides.
- Take a slow, controlled lunge backward with one foot. As you lunge, lower your body and allow the lunging knee to bend until your thigh is parallel to the ground.
- Keeping your abs pulled in and pressing your forward heel into the floor, step forward to a standing position.
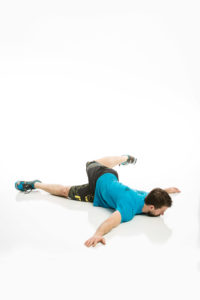
Scorpion
- Lie face-down on a mat or on the floor. Stretch your arms out to either side, forming a T.
- Lift your left leg away from the floor as far as you can, then move it to the right, crossing it over your right leg. As you do this, twist your hips to the right, allowing the left leg to touch the ground on the right side.
- Return your left leg back to starting position and repeat the movement with your right leg.
Sit-up (grab your rolled-up towel or AbMat and place it above your waistband, against your tailbone)
- Lie on your back with arms overhead and feet in a butterfly position (soles of feet touching).
- Take a breath in and forcefully “throw” your arms over your body as you sit up.
- Touch your shoes as you exhale and return to a lying position, keeping the arms straight. Make sure your shoulder blades touch the floor at the bottom to achieve the full range of motion.
Squat Pulse
- Perform an air squat, but instead of standing all the way up, use your glutes to lift only a few inches. Repeat this pulsing motion for the given number of reps.
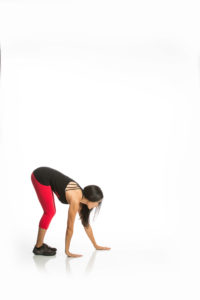
Walk Out/ Walk In
- Begin in a standing position. Bend over to touch your toes and walk your hands out until you are in a plank position.
- Walk the hands back in to your feet keeping legs as straight as possible, and repeat for the given number of repetitions.
I hope you enjoy these workouts! For more at-home routines, check out my Perfect Fit series here!

[1] I recommend placing a tightly rolled up towel or small, firm pillow above your waistband to help support your back on sit-ups.
[2] Refer to the intro. for more on Tabata training.